首先我们来回顾下代理的概念,所谓代理就是指的是一端面向客户端,另外一端面向服务端,代理客户端访问服务端,我们把这种代理叫正向代理;代理服务端响应客户端我们叫做反向代理,这个我们在之前Nginx系列博客中阐述过这样的概念;不管是正向代理还是反向代理他们都是代理,他们都有一个共同点就是代表一端(客户端/服务端)访问或响应另一端;简单讲代理就是即充当服务端角色又充当客户端角色;在mariadb的主从复制集群中,读的能力被扩展了,而写的能力始终没有被扩展;这样一来对于主服务器就存在单点的问题,通常除了做双主可解决主节点单点的问题,我们还可以给主节点做高可用;而对于mariadb的主从复制集群来讲,虽然读的能力提升了,但通常情况后端数据库服务器是直接面向程序,这意味着程序要知道读请求和写请求该发往不同的数据库服务器上;在用户发来读请求,这个程序它会分析用户的请求,然后把用户的请求代理到后端server上;也就是说我们需要一个程序能够解析用户的读写操作,把对应的操作代理到后端不同的节点上;这样一来用户的读操作始终均衡的被调度到从节点,写操作调度到主节点;proxysql这款软件就有我们上面说的功能,它能够将用户发来的读写操作,通过proxysql的语句路由,把对应请求分别发送到不同节点执行;如下图所示:
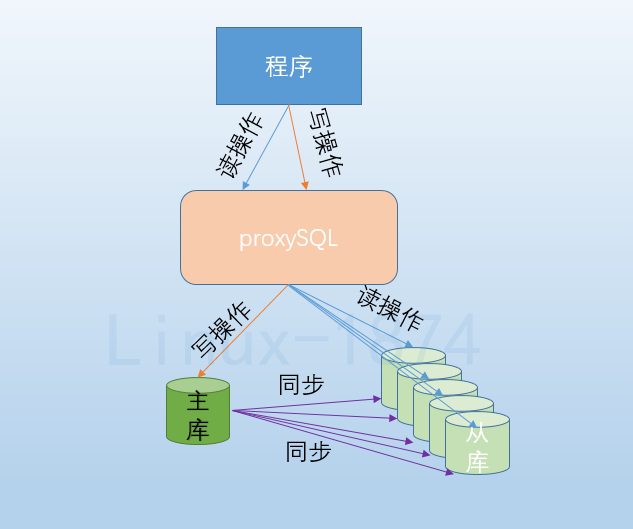
从上面的图片可以看到,proxysql就是一代理,面向程序它就是一数据库服务器,程序把读操作和写操作都发送给它,然后proxysql通过我们定义的路由规则,把对应语句再代理到不同的后端主从架构节点上执行;接下来我们来看看proxysql的配置和使用吧;以下实验室基于mariadb的主从复制集群上做的,有关主从复制的配置请参考https://www.cnblogs.com/qiuhom-1874/tag/mariadb%E4%B8%BB%E4%BB%8E%E5%A4%8D%E5%88%B6/;

2、查看proxysql的简介
[root@lxc ~]# yum info proxysql
Loaded plugins: fastestmirror
Loading mirror speeds from cached hostfile
 * base: mirrors.aliyun.com
 * extras: mirrors.aliyun.com
 * updates: mirrors.aliyun.com
Available Packages
Name        : proxysql
Arch        : x86_64
Version     : 2.0.12
Release     : 1
Size        : 9.8 M
Repo        : proxysql_repo/7
Summary     : A high-performance MysqL proxy
URL         : https://proxysql.com/
License     : GPL+
Description : A high-performance MysqL proxy

[root@lxc ~]#
提示:如果添加了yum直接yum info proxysql能够看到以上信息,表示我们添加到yum源已经生效;
3、安装proxysql
[root@lxc ~]# yum install proxysql
Loaded plugins: fastestmirror
proxysql_repo                                                                                                                                 | 2.9 kB  00:00:00
Loading mirror speeds from cached hostfile
 * base: mirrors.aliyun.com
 * extras: mirrors.aliyun.com
 * updates: mirrors.aliyun.com
Resolving Dependencies
--> Running transaction check
---> Package proxysql.x86_64 0:2.0.12-1 will be installed
--> Processing Dependency: libgnutls.so.28(GNUTLS_3_1_0)(64bit) for package: proxysql-2.0.12-1.x86_64
--> Processing Dependency: libgnutls.so.28(GNUTLS_3_0_0)(64bit) for package: proxysql-2.0.12-1.x86_64
--> Processing Dependency: gnutls for package: proxysql-2.0.12-1.x86_64
--> Processing Dependency: libgnutls.so.28(GNUTLS_1_4)(64bit) for package: proxysql-2.0.12-1.x86_64
--> Processing Dependency: libgnutls.so.28()(64bit) for package: proxysql-2.0.12-1.x86_64
--> Running transaction check
---> Package gnutls.x86_64 0:3.3.29-9.el7_6 will be installed
--> Processing Dependency: trousers >= 0.3.11.2 for package: gnutls-3.3.29-9.el7_6.x86_64
--> Processing Dependency: libnettle.so.4()(64bit) for package: gnutls-3.3.29-9.el7_6.x86_64
--> Processing Dependency: libhogweed.so.2()(64bit) for package: gnutls-3.3.29-9.el7_6.x86_64
--> Running transaction check
---> Package nettle.x86_64 0:2.7.1-8.el7 will be installed
---> Package trousers.x86_64 0:0.3.14-2.el7 will be installed
--> Finished Dependency Resolution

Dependencies Resolved

=====================================================================================================================================================================
 Package                              Arch                               Version                                     Repository                                 Size
=====================================================================================================================================================================
Installing:
 proxysql                             x86_64                             2.0.12-1                                    proxysql_repo                             9.8 M
Installing for dependencies:
 gnutls                               x86_64                             3.3.29-9.el7_6                              base                                      680 k
 nettle                               x86_64                             2.7.1-8.el7                                 base                                      327 k
 trousers                             x86_64                             0.3.14-2.el7                                base                                      289 k

Transaction Summary
=====================================================================================================================================================================
Install  1 Package (+3 Dependent packages)

Total download size: 11 M
Installed size: 41 M
Is this ok [y/d/N]: y
Downloading packages:
(1/4): gnutls-3.3.29-9.el7_6.x86_64.rpm                                                                                                       | 680 kB  00:00:00
(2/4): nettle-2.7.1-8.el7.x86_64.rpm                                                                                                          | 327 kB  00:00:00
(3/4): trousers-0.3.14-2.el7.x86_64.rpm                                                                                                       | 289 kB  00:00:00
warning: /var/cache/yum/x86_64/7/proxysql_repo/packages/proxysql-2.0.12-1-centos7.x86_64.rpm: Header V4 RSA/SHA256 Signature,key ID 79953b49: NOKEYMB  00:00:04 ETA
Public key for proxysql-2.0.12-1-centos7.x86_64.rpm is not installed
(4/4): proxysql-2.0.12-1-centos7.x86_64.rpm                                                                                                   | 9.8 MB  00:28:05
---------------------------------------------------------------------------------------------------------------------------------------------------------------------
Total                                                                                                                                6.7 kB/s |  11 MB  00:28:05
Retrieving key from https://repo.proxysql.com/Proxysql/repo_pub_key
Importing GPG key 0x79953B49:
 Userid     : "rene cannnao (Proxysql Repository) <rene.cannao@gmail.com>"
 Fingerprint: 1448 bf69 3ca6 00c7 99eb 9358 04a5 62fb 7995 3b49
 From       : https://repo.proxysql.com/Proxysql/repo_pub_key
Is this ok [y/N]: y
Running transaction check
Running transaction test
Transaction test succeeded
Running transaction
  Installing : trousers-0.3.14-2.el7.x86_64                                                                                                                      1/4
  Installing : nettle-2.7.1-8.el7.x86_64                                                                                                                         2/4
  Installing : gnutls-3.3.29-9.el7_6.x86_64                                                                                                                      3/4
  Installing : proxysql-2.0.12-1.x86_64                                                                                                                          4/4
warning: group proxysql does not exist - using root
warning: group proxysql does not exist - using root
Created symlink from /etc/systemd/system/multi-user.target.wants/proxysql.service to /etc/systemd/system/proxysql.service.
  Verifying  : gnutls-3.3.29-9.el7_6.x86_64                                                                                                                      1/4
  Verifying  : proxysql-2.0.12-1.x86_64                                                                                                                          2/4
  Verifying  : nettle-2.7.1-8.el7.x86_64                                                                                                                         3/4
  Verifying  : trousers-0.3.14-2.el7.x86_64                                                                                                                      4/4

Installed:
  proxysql.x86_64 0:2.0.12-1

Dependency Installed:
  gnutls.x86_64 0:3.3.29-9.el7_6                         nettle.x86_64 0:2.7.1-8.el7                         trousers.x86_64 0:0.3.14-2.el7

Complete!
[root@lxc ~]#
提示:除此以上方式安装proxysql,当然也可以直接使用wget 去github上的项目地址下载
[root@lxc ~]# wget https://github.com/sysown/proxysql/releases/download/v2.0.12/proxysql-2.0.12-1-centos7.x86_64.rpm
提示:下载好proxysql 包后,然后通过yum直接安装即可;推荐使用yum来安装下载好的包,它可以解决依赖关系,不推荐使用rpm 安装;
[root@lxc ~]# rpm -ql proxysql
/etc/logrotate.d/proxysql
/etc/proxysql.cnf
/etc/systemd/system/proxysql-initial.service
/etc/systemd/system/proxysql.service
/usr/bin/proxysql
/usr/share/proxysql/tools/proxysql_galera_checker.sh
/usr/share/proxysql/tools/proxysql_galera_writer.pl
[root@lxc ~]#
提示:从上面的信息可以看到proxysql的配置文件是/etc/proxysql.cnf,二进制文件是/usr/bin/proxysql,unit file是/etc/systemd/system/proxysql.service
5、配置proxysql
[root@lxc ~]# cat /etc/proxysql.cnf
########################################################################################

datadir="/var/lib/proxysql"
errorlog="/var/lib/proxysql/proxysql.log"

admin_variables=
{
        admin_credentials="admin:admin"
#       MysqL_ifaces="127.0.0.1:6032;/tmp/proxysql_admin.sock"
        MysqL_ifaces="0.0.0.0:6033"
#       refresh_interval=2000
#       debug=true
}

MysqL_variables=
{
        threads=4
        max_connections=2048
        default_query_delay=0
        default_query_timeout=36000000
        have_compress=true
        poll_timeout=2000
#       interfaces="0.0.0.0:6033;/tmp/proxysql.sock"
        interfaces="0.0.0.0:3306"
        default_schema="information_schema"
        stacksize=1048576
        server_version="5.5.30"
        connect_timeout_server=3000
# make sure to configure monitor username and password
# https://github.com/sysown/proxysql/wiki/Global-variables#MysqL-monitor_username-MysqL-monitor_password
        monitor_username="monitor"
        monitor_password="monitor"
        monitor_history=600000
        monitor_connect_interval=60000
        monitor_ping_interval=10000
        monitor_read_only_interval=1500
        monitor_read_only_timeout=500
        ping_interval_server_msec=120000
        ping_timeout_server=500
        commands_stats=true
        sessions_sort=true
        connect_retries_on_failure=10
}


# defines all the MysqL servers
MysqL_servers =
(
        {
                address = "192.168.0.22" # no default,required . If port is 0,address is interpred as a Unix Socket Domain
                port = 3306           # no default,address is interpred as a Unix Socket Domain
                hostgroup = 3           # no default,required
                status = "ONLINE"     # default: ONLINE
                weight = 1            # default: 1
                compression = 0       # default: 0
                max_replication_lag = 10  # default 0 . If greater than 0 and replication lag passes such threshold,the server is shunned
        },{
                address = "192.168.0.23" # no default,address is interpred as a Unix Socket Domain
                hostgroup = 4           # no default,the server is shunned
        }
)


# defines all the MysqL users
MysqL_users:
(
        {
                username = "root" # no default,required
                password = "admin123.com" # default: ''
                default_hostgroup = 3 # default: 0
                active = 1            # default: 1
        }
)


#defines MysqL Query Rules
MysqL_query_rules:
(
        {
                rule_id=1
                active=1
                match_pattern="^SELECT .* FOR UPDATE$"
                destination_hostgroup=3
                apply=1
        },{
                rule_id=2
                active=1
                match_pattern="^SELECT"
                destination_hostgroup=4
                apply=1
        }
)


MysqL_replication_hostgroups=
(
        {
                writer_hostgroup=3
                reader_hostgroup=4
                comment="test repl 1"
       }
)

[root@lxc ~]#
提示:proxysql配置文件分几个大段,admin_variables这个段里主要配置管理相关变量,比如管理用户名和密码,监听的地址和端口等等;MysqL_variables配置proxysql连接后端MysqL相关配置,里面有连接后端的server监听的端口,线程数,最大连接数,以及监控相关参数;MysqL_servers配置后端MysqL/mariadb服务器的地址端口,以及权重,所属组等;MysqL_users配置连接后端MysqL/mariadb所需的账号和密码以及默认连接到的组;MysqL_query_rules配置查询规则,那些语句是写操作,那些语句是读操作;MysqL_replication_hostgroups配置写操作对应的组号和读操作对应组号;这里需要注意一点,如果一个配置段中有多个大括号,相互之间用逗号隔离,如果是最后一个大括号需要把后面的逗号去掉;
6、在主从复制节点创建上面配置的账号信息
创建root账号
[root@docker_node01 ~]# MysqL
Welcome to the MariaDB monitor.  Commands end with ; or \g.
Your MariaDB connection id is 9
Server version: 5.5.65-MariaDB MariaDB Server

Copyright (c) 2000,2018,Oracle,MariaDB Corporation Ab and others.

Type 'help;' or '\h' for help. Type '\c' to clear the current input statement.

MariaDB [(none)]> select user,host,password from MysqL.user;
+---------+-------------------+-------------------------------------------+
| user    | host              | password                                  |
+---------+-------------------+-------------------------------------------+
| root    | localhost         |                                           |
| root    | docker\_node01.io |                                           |
| root    | 127.0.0.1         |                                           |
| root    | ::1               |                                           |
| rpluser | 192.168.0.%       | *4ACFE3202A5FF5CF467898FC58AAB1D615029441 |
+---------+-------------------+-------------------------------------------+
5 rows in set (0.00 sec)

MariaDB [(none)]> grant all on *.* to 'root'@'192.168.0.%' identified by 'admin123.com' with grant option;
Query OK,0 rows affected (0.01 sec)

MariaDB [(none)]> select user,password from MysqL.user;
+---------+-------------------+-------------------------------------------+
| user    | host              | password                                  |
+---------+-------------------+-------------------------------------------+
| root    | localhost         |                                           |
| root    | docker\_node01.io |                                           |
| root    | 127.0.0.1         |                                           |
| root    | ::1               |                                           |
| rpluser | 192.168.0.%       | *4ACFE3202A5FF5CF467898FC58AAB1D615029441 |
| root    | 192.168.0.%       | *2D9AC2437F9E59A51BE8BA89A3D59E76F32F55E8 |
+---------+-------------------+-------------------------------------------+
6 rows in set (0.00 sec)

MariaDB [(none)]>
提示:在主节点创建账号会自动同步到从节点,所以从节点可以不用再创建;
创建monitor账号
MariaDB [(none)]> grant all on *.* to 'monitor'@'192.168.0.%' identified by 'monitor' with grant option;
Query OK,password from MysqL.user;
+---------+-------------------+-------------------------------------------+
| user    | host              | password                                  |
+---------+-------------------+-------------------------------------------+
| root    | localhost         |                                           |
| root    | docker\_node01.io |                                           |
| root    | 127.0.0.1         |                                           |
| root    | ::1               |                                           |
| rpluser | 192.168.0.%       | *4ACFE3202A5FF5CF467898FC58AAB1D615029441 |
| root    | 192.168.0.%       | *2D9AC2437F9E59A51BE8BA89A3D59E76F32F55E8 |
| monitor | 192.168.0.%       | *1975D095AC033CAF4E1BF94F7202A9BBFEEB66F1 |
+---------+-------------------+-------------------------------------------+
7 rows in set (0.00 sec)

MariaDB [(none)]>
7、启动proxysql

提示:可以看到我们配置的proxysql管理端监听在6033,启动4个线程来连接后端mariadb服务器,对应的端口都已经处于监听状态了;
8、连接管理端口
[root@lxc ~]# MysqL -uadmin -padmin -h192.168.0.21 -P6033
ERROR 1040 (42000): User 'admin' can only connect locally
[root@lxc ~]# MysqL -uadmin -padmin -h127.0.0.1 -P6033
Welcome to the MariaDB monitor.  Commands end with ; or \g.
Your MysqL connection id is 7
Server version: 5.5.30 (Proxysql Admin Module)

Copyright (c) 2000,MariaDB Corporation Ab and others.

Type 'help;' or '\h' for help. Type '\c' to clear the current input statement.

MysqL [(none)]> show databases;
+-----+---------------+-------------------------------------+
| seq | name          | file                                |
+-----+---------------+-------------------------------------+
| 0   | main          |                                     |
| 2   | disk          | /var/lib/proxysql/proxysql.db       |
| 3   | stats         |                                     |
| 4   | monitor       |                                     |
| 5   | stats_history | /var/lib/proxysql/proxysql_stats.db |
+-----+---------------+-------------------------------------+
5 rows in set (0.001 sec)

MysqL [(none)]>
提示:管理接口默认只能本地连接,但是我们配置管理接口监听在本机所有地址上,所以连接时指定主机地址要使用127.0.0.1才可以,如果使用localhost,它默认会通过sock文件去连接;从上面的结果可以看到,在proxysql上有5个库,其中main库主要存放我们刚才配置相关的表在里面;如下
MysqL [(none)]> use main
Reading table information for completion of table and column names
You can turn off this feature to get a quicker startup with -A

Database changed
MysqL [main]> show tables;
+----------------------------------------------------+
| tables                                             |
+----------------------------------------------------+
| global_variables                                   |
| MysqL_aws_aurora_hostgroups                        |
| MysqL_collations                                   |
| MysqL_firewall_whitelist_rules                     |
| MysqL_firewall_whitelist_sqli_fingerprints         |
| MysqL_firewall_whitelist_users                     |
| MysqL_galera_hostgroups                            |
| MysqL_group_replication_hostgroups                 |
| MysqL_query_rules                                  |
| MysqL_query_rules_fast_routing                     |
| MysqL_replication_hostgroups                       |
| MysqL_servers                                      |
| MysqL_users                                        |
| proxysql_servers                                   |
| restapi_routes                                     |
| runtime_checksums_values                           |
| runtime_global_variables                           |
| runtime_MysqL_aws_aurora_hostgroups                |
| runtime_MysqL_firewall_whitelist_rules             |
| runtime_MysqL_firewall_whitelist_sqli_fingerprints |
| runtime_MysqL_firewall_whitelist_users             |
| runtime_MysqL_galera_hostgroups                    |
| runtime_MysqL_group_replication_hostgroups         |
| runtime_MysqL_query_rules                          |
| runtime_MysqL_query_rules_fast_routing             |
| runtime_MysqL_replication_hostgroups               |
| runtime_MysqL_servers                              |
| runtime_MysqL_users                                |
| runtime_proxysql_servers                           |
| runtime_restapi_routes                             |
| runtime_scheduler                                  |
| scheduler                                          |
+----------------------------------------------------+
32 rows in set (0.001 sec)

MysqL [main]> select * from MysqL_servers;
+--------------+--------------+------+-----------+--------+--------+-------------+-----------------+---------------------+---------+----------------+---------+
| hostgroup_id | hostname     | port | gtid_port | status | weight | compression | max_connections | max_replication_lag | use_ssl | max_latency_ms | comment |
+--------------+--------------+------+-----------+--------+--------+-------------+-----------------+---------------------+---------+----------------+---------+
| 3            | 192.168.0.22 | 3306 | 0         | ONLINE | 1      | 0           | 1000            | 10                  | 0       | 0              |         |
| 4            | 192.168.0.23 | 3306 | 0         | ONLINE | 1      | 0           | 1000            | 10                  | 0       | 0              |         |
+--------------+--------------+------+-----------+--------+--------+-------------+-----------------+---------------------+---------+----------------+---------+
2 rows in set (0.001 sec)

MysqL [main]>
提示:main库中的表以runtime开头的表示当前生效的配置,如果我们要运行时修改配置,我们需要先修改不是runtime开头的表,然后通过load 加载到runtime开头的表中,然后在save存储到文件;
proxysql的多层配置系统
+-------------------------+
|         RUNTIME         |
+-------------------------+
       /|\          |
        |           |
    [1] |       [2] |
        |          \|/
+-------------------------+
|         MEMORY          |
+-------------------------+ _
       /|\          |      |\
        |           |        \
    [3] |       [4] |         \ [5]
        |          \|/         \
+-------------------------+  +-------------------------+
|          DISK           |  |       CONFIG FILE       |
+-------------------------+  +-------------------------+
提示:从上面的图可以看到proxysql的配置系统分三层,最上面一层是runtime层,该层主要是说通过读取第二层的memory层,而memory主要通过disk或configfile层来获取配置;第一次启动proxysql时,它会从config file层读取配置文件内容到memory层,然后runtime层读取memory层,随后我们就可以通过修改memory层,然后通过load加载到runtime层,或者save存储到disk层;
在各层间移动配置
MysqL user相关操作:
	LOAD MysqL USERS FROM MEMORY / LOAD MysqL USERS TO RUNTIME
	将MysqL user从内存数据库加载到运行时数据结构,反之亦然
	SAVE MysqL USERS TO MEMORY / SAVE MysqL USERS FROM RUNTIME
	将MysqL user从运行时持久化到内存数据库
	LOAD MysqL USERS TO MEMORY / LOAD MysqL USERS FROM DISK
	将持久化的MysqL user从磁盘数据库加载到内存数据库
  	SAVE MysqL USERS FROM MEMORY / SAVE MysqL USERS TO DISK
	将MysqL user从内存数据库持久化到磁盘数据库
	LOAD MysqL USERS FROM CONFIG
	从配置文件中将MysqL user加载到内存数据库中

MysqL server相关操作:
	LOAD MysqL SERVERS FROM MEMORY / LOAD MysqL SERVERS TO RUNTIME
	将MysqL server从内存数据库加载到运行时
	SAVE MysqL SERVERS TO MEMORY / SAVE MysqL SERVERS FROM RUNTIME
	将MysqL server从运行时持久化到内存数据库
	LOAD MysqL SERVERS TO MEMORY / LOAD MysqL SERVERS FROM DISK
	将MysqL server从磁盘数据库加载到内存数据库
	SAVE MysqL SERVERS FROM MEMORY / SAVE MysqL SERVERS TO DISK
	将MysqL server从内存数据库持久化到磁盘数据库
	LOAD MysqL SERVERS FROM CONFIG
	从配置文件将服务器加载到内存数据库中

MysqL query rules相关操作:
	LOAD MysqL QUERY RULES FROM MEMORY / LOAD MysqL QUERY RULES TO RUNTIME
	将MySQL查询规则从内存数据库加载到运行时数据结构
	SAVE MysqL QUERY RULES TO MEMORY / SAVE MysqL QUERY RULES FROM RUNTIME
	将MySQL查询规则从运行时数据结构持久化到内存数据库
	LOAD MysqL QUERY RULES TO MEMORY / LOAD MysqL QUERY RULES FROM DISK
	将MySQL查询规则从磁盘数据库加载到内存数据库
	SAVE MysqL QUERY RULES FROM MEMORY / SAVE MysqL QUERY RULES TO DISK
	将MySQL查询规则从内存数据库持久化到磁盘数据库
	LOAD MysqL QUERY RULES FROM CONFIG
	从配置文件查询规则加载到内存数据库中

MysqL variables相关操作:
	LOAD MysqL VARIABLES FROM MEMORY / LOAD MysqL VARIABLES TO RUNTIME
	将MysqL变量从内存数据库加载到运行时数据结构
	SAVE MysqL VARIABLES FROM MEMORY / SAVE MysqL VARIABLES TO DISK
	将MysqL变量从内存数据库持久化到磁盘数据库
	LOAD MysqL VARIABLES TO MEMORY / LOAD MysqL VARIABLES FROM DISK
	将MysqL变量从磁盘数据库加载到内存数据库
	SAVE MysqL VARIABLES TO MEMORY / SAVE MysqL VARIABLES FROM RUNTIME
	将MysqL变量从运行时数据结构持久存储到内存数据库中
	LOAD MysqL VARIABLES FROM CONFIG
	将配置文件变量加载到内存数据库中

admin variables相关操作:
	LOAD ADMIN VARIABLES FROM MEMORY / LOAD ADMIN VARIABLES TO RUNTIME
	将内存数据库中的管理变量加载到运行时
	SAVE ADMIN VARIABLES TO MEMORY / SAVE ADMIN VARIABLES FROM RUNTIME
	将管理变量从运行时持久化到内存数据库
	LOAD ADMIN VARIABLES TO MEMORY / LOAD ADMIN VARIABLES FROM DISK
	将管理变量从磁盘数据库加载到内存数据库
	SAVE ADMIN VARIABLES FROM MEMORY / SAVE ADMIN VARIABLES TO DISK
	将管理变量从内存数据库持久化到磁盘数据库
	LOAD ADMIN VARIABLES FROM CONFIG
	将配置文件管理变量加载到内存数据库中


注意:以上命令允许使用以下快捷方式:
MEM for MEMORY
RUN for RUNTIME

例如,这两个命令是等效的:
SAVE ADMIN VARIABLES TO MEMORY
SAVE ADMIN VARIABLES TO MEM
提示:以上命令在配置更改加载到RUNTIME之前不会激活任何修改,也就是说只有runtime中的配置生效;
[root@lxc ~]# MysqL -uadmin -padmin -h127.0.0.1 -P6033
Welcome to the MariaDB monitor.  Commands end with ; or \g.
Your MysqL connection id is 3
Server version: 5.5.30 (Proxysql Admin Module)

Copyright (c) 2000,MariaDB Corporation Ab and others.

Type 'help;' or '\h' for help. Type '\c' to clear the current input statement.

MysqL [(none)]> select * from MysqL_servers;
+--------------+--------------+------+-----------+--------+--------+-------------+-----------------+---------------------+---------+----------------+---------+
| hostgroup_id | hostname     | port | gtid_port | status | weight | compression | max_connections | max_replication_lag | use_ssl | max_latency_ms | comment |
+--------------+--------------+------+-----------+--------+--------+-------------+-----------------+---------------------+---------+----------------+---------+
| 3            | 192.168.0.22 | 3306 | 0         | ONLINE | 1      | 0           | 1000            | 10                  | 0       | 0              |         |
| 4            | 192.168.0.23 | 3306 | 0         | ONLINE | 1      | 0           | 1000            | 10                  | 0       | 0              |         |
+--------------+--------------+------+-----------+--------+--------+-------------+-----------------+---------------------+---------+----------------+---------+
2 rows in set (0.001 sec)

MysqL [(none)]> insert into MysqL_servers values (4,'192.168.0.21',3307,'ONLINE',1,1000,10,'');
Query OK,1 row affected (0.001 sec)

MysqL [(none)]> select * from MysqL_servers;
+--------------+--------------+------+-----------+--------+--------+-------------+-----------------+---------------------+---------+----------------+---------+
| hostgroup_id | hostname     | port | gtid_port | status | weight | compression | max_connections | max_replication_lag | use_ssl | max_latency_ms | comment |
+--------------+--------------+------+-----------+--------+--------+-------------+-----------------+---------------------+---------+----------------+---------+
| 3            | 192.168.0.22 | 3306 | 0         | ONLINE | 1      | 0           | 1000            | 10                  | 0       | 0              |         |
| 4            | 192.168.0.23 | 3306 | 0         | ONLINE | 1      | 0           | 1000            | 10                  | 0       | 0              |         |
| 4            | 192.168.0.21 | 3307 | 0         | ONLINE | 1      | 0           | 1000            | 10                  | 0       | 0              |         |
+--------------+--------------+------+-----------+--------+--------+-------------+-----------------+---------------------+---------+----------------+---------+
3 rows in set (0.001 sec)

MysqL [(none)]>
提示:以上操作只在memory层中修改,并未加载到runtime,所以在runtime_MysqL_servers表中还是两台后端server
加载MysqL server memory层到runtime层
MysqL [(none)]> show tables;
+----------------------------------------------------+
| tables                                             |
+----------------------------------------------------+
| global_variables                                   |
| MysqL_aws_aurora_hostgroups                        |
| MysqL_collations                                   |
| MysqL_firewall_whitelist_rules                     |
| MysqL_firewall_whitelist_sqli_fingerprints         |
| MysqL_firewall_whitelist_users                     |
| MysqL_galera_hostgroups                            |
| MysqL_group_replication_hostgroups                 |
| MysqL_query_rules                                  |
| MysqL_query_rules_fast_routing                     |
| MysqL_replication_hostgroups                       |
| MysqL_servers                                      |
| MysqL_users                                        |
| proxysql_servers                                   |
| restapi_routes                                     |
| runtime_checksums_values                           |
| runtime_global_variables                           |
| runtime_MysqL_aws_aurora_hostgroups                |
| runtime_MysqL_firewall_whitelist_rules             |
| runtime_MysqL_firewall_whitelist_sqli_fingerprints |
| runtime_MysqL_firewall_whitelist_users             |
| runtime_MysqL_galera_hostgroups                    |
| runtime_MysqL_group_replication_hostgroups         |
| runtime_MysqL_query_rules                          |
| runtime_MysqL_query_rules_fast_routing             |
| runtime_MysqL_replication_hostgroups               |
| runtime_MysqL_servers                              |
| runtime_MysqL_users                                |
| runtime_proxysql_servers                           |
| runtime_restapi_routes                             |
| runtime_scheduler                                  |
| scheduler                                          |
+----------------------------------------------------+
32 rows in set (0.001 sec)

MysqL [(none)]> select * from runtime_MysqL_servers;
+--------------+--------------+------+-----------+--------+--------+-------------+-----------------+---------------------+---------+----------------+---------+
| hostgroup_id | hostname     | port | gtid_port | status | weight | compression | max_connections | max_replication_lag | use_ssl | max_latency_ms | comment |
+--------------+--------------+------+-----------+--------+--------+-------------+-----------------+---------------------+---------+----------------+---------+
| 3            | 192.168.0.22 | 3306 | 0         | ONLINE | 1      | 0           | 1000            | 10                  | 0       | 0              |         |
| 4            | 192.168.0.23 | 3306 | 0         | ONLINE | 1      | 0           | 1000            | 10                  | 0       | 0              |         |
+--------------+--------------+------+-----------+--------+--------+-------------+-----------------+---------------------+---------+----------------+---------+
2 rows in set (0.006 sec)

MysqL [(none)]> select * from MysqL_servers;
+--------------+--------------+------+-----------+--------+--------+-------------+-----------------+---------------------+---------+----------------+---------+
| hostgroup_id | hostname     | port | gtid_port | status | weight | compression | max_connections | max_replication_lag | use_ssl | max_latency_ms | comment |
+--------------+--------------+------+-----------+--------+--------+-------------+-----------------+---------------------+---------+----------------+---------+
| 3            | 192.168.0.22 | 3306 | 0         | ONLINE | 1      | 0           | 1000            | 10                  | 0       | 0              |         |
| 4            | 192.168.0.23 | 3306 | 0         | ONLINE | 1      | 0           | 1000            | 10                  | 0       | 0              |         |
| 4            | 192.168.0.21 | 3307 | 0         | ONLINE | 1      | 0           | 1000            | 10                  | 0       | 0              |         |
+--------------+--------------+------+-----------+--------+--------+-------------+-----------------+---------------------+---------+----------------+---------+
3 rows in set (0.001 sec)

MysqL [(none)]> load MysqL servers to runtime;
Query OK,0 rows affected (0.015 sec)

MysqL [(none)]> select * from runtime_MysqL_servers;
+--------------+--------------+------+-----------+--------+--------+-------------+-----------------+---------------------+---------+----------------+---------+
| hostgroup_id | hostname     | port | gtid_port | status | weight | compression | max_connections | max_replication_lag | use_ssl | max_latency_ms | comment |
+--------------+--------------+------+-----------+--------+--------+-------------+-----------------+---------------------+---------+----------------+---------+
| 3            | 192.168.0.22 | 3306 | 0         | ONLINE | 1      | 0           | 1000            | 10                  | 0       | 0              |         |
| 4            | 192.168.0.21 | 3307 | 0         | ONLINE | 1      | 0           | 1000            | 10                  | 0       | 0              |         |
| 4            | 192.168.0.23 | 3306 | 0         | ONLINE | 1      | 0           | 1000            | 10                  | 0       | 0              |         |
+--------------+--------------+------+-----------+--------+--------+-------------+-----------------+---------------------+---------+----------------+---------+
3 rows in set (0.006 sec)

MysqL [(none)]>
提示:可以看到执行load操作后,runtime_MysqL_servers就加载进去了;此时我们就把memory层的信息加载到runtime层生效了;
验证:通过连接proxysql所在主机的3306端口,执行写操作,看看是否能够同步到其他从节点?

提示:可以看到在proxysql所在主机连接3306线程,是可以连接到主库,因为默认配置连接是到主库,然后在其上创建一个mydb的数据库,也能够及时的同步到其他从库;
测试:读写操作是否分别调度到不同的节点上?
[root@lxc ~]# for i in {1..10} ;do MysqL -uroot -padmin123.com -P3306 -h192.168.0.21 -e "select @@server_id" ; done
+-------------+
| @@server_id |
+-------------+
|           2 |
+-------------+
+-------------+
| @@server_id |
+-------------+
|           2 |
+-------------+
+-------------+
| @@server_id |
+-------------+
|           2 |
+-------------+
+-------------+
| @@server_id |
+-------------+
|           3 |
+-------------+
+-------------+
| @@server_id |
+-------------+
|           1 |
+-------------+
+-------------+
| @@server_id |
+-------------+
|           1 |
+-------------+
+-------------+
| @@server_id |
+-------------+
|           1 |
+-------------+
+-------------+
| @@server_id |
+-------------+
|           3 |
+-------------+
+-------------+
| @@server_id |
+-------------+
|           1 |
+-------------+
+-------------+
| @@server_id |
+-------------+
|           3 |
+-------------+
[root@lxc ~]# for i in {1..10} ;do MysqL -uroot -padmin123.com -P3306 -h192.168.0.21 -e "select @@server_id for update" ; done
+-------------+
| @@server_id |
+-------------+
|           1 |
+-------------+
+-------------+
| @@server_id |
+-------------+
|           1 |
+-------------+
+-------------+
| @@server_id |
+-------------+
|           1 |
+-------------+
+-------------+
| @@server_id |
+-------------+
|           1 |
+-------------+
+-------------+
| @@server_id |
+-------------+
|           1 |
+-------------+
+-------------+
| @@server_id |
+-------------+
|           1 |
+-------------+
+-------------+
| @@server_id |
+-------------+
|           1 |
+-------------+
+-------------+
| @@server_id |
+-------------+
|           1 |
+-------------+
+-------------+
| @@server_id |
+-------------+
|           1 |
+-------------+
+-------------+
| @@server_id |
+-------------+
|           1 |
+-------------+
[root@lxc ~]#
提示:可以看到当执行有写锁时,就立刻把操作调度到server_id=1的主库上去操作;读操作是随机调度到各个节点上进行处理;